In this guide, we will walk you through the process of creating a new store location within the Flawless POS system. Follow the steps below to efficiently set up and manage your store location.
You may refer to this video for a step-by-step guide on How to Create a Store Location: https://www.youtube.com/watch?v=IJX_uOfaD8Y
Step 1: Access the Admin Panel
Open Your Left Navigation Menu.
Click on the Store Menu Option.
Select the Admin Option:

Enter Your Admin Security Code: You will be prompted to enter your admin security code to gain access.

Step 2: Navigate to the Stores Tab
Click the Stores Tab: This will display all your available store locations.

Click on the Add Another Store Button: This initiates the process to create a new store.

Step 3: Enter the Store Details
A new dialogue box will appear, allowing you to enter basic details for the store.
Below are the fields:
Store Name: Enter the name you want to assign to the new store.
Address: Fill in the address details for the location.
City: Fill in the City details for the store’s location
State: Fill in the State Details for the store’s location
Zip Code: Enter the Zip Code for the location.
Once you are satisfied with your inputs, click OK to create the store.
Step 4: Review Newly Added Store
After creating the new store, it will appear in the list of available stores.
Click on the Newly Added Store: This will expand the details, allowing you to continue editing and filling out other necessary information.

Step 5: Reviewing the Details of the Store
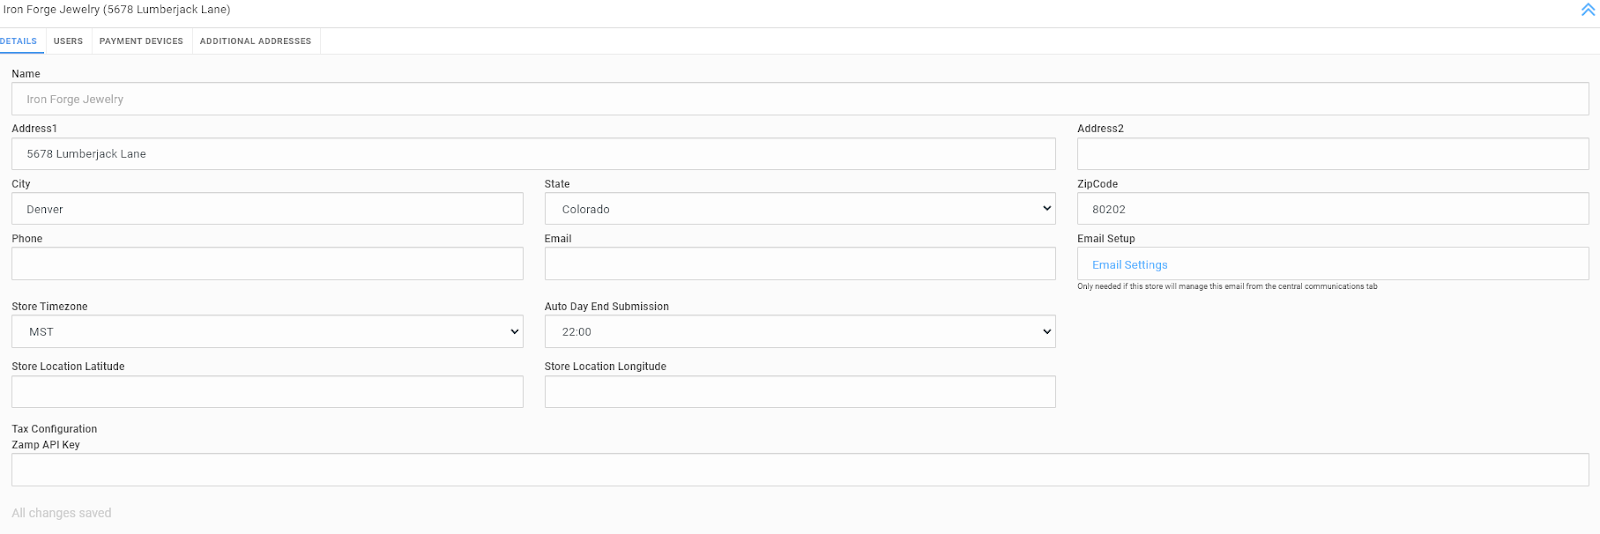
Once you've created a new store location, expand its details to configure additional settings and review various sections within the store's profile. Each tab contains specific details to ensure accurate store configuration. Below are the different Tabs along with their corresponding details:
Details Tab: This tab includes essential configuration details for the store location.

Name: The name of the store.
Address: The physical address of the store.
City: The city where the store is located.
State: The state for the store’s location.
Zipcode: The postal code for the store’s address.
Phone: The primary contact number for the store.
Email: The store's email address for communication.
Setup:
Username: The username required for store login access.
Password: The password associated with the username.
IMAP Server: Enter the IMAP server address for email configuration.
Port: The port number for connecting to the IMAP server.
SSL: A slider to enable SSL (Secure Sockets Layer) for secure data connections.
Store Timezone: Set the timezone for store operations.
Auto Day End Submission: Choose an automatic day-end submission time (options include 20:00, 21:00, 22:00, or 23:00).
Store Location Latitude: Specify the latitude coordinates for the store’s location.
Store Location Longitude: Specify the longitude coordinates for the store’s location.
Tax Configuration Zamp API Key: Enter the API key for tax configuration purposes.
Users Tab: Manage users associated with this store location.

Add User Button: Opens a New User dialog box where you can assign users to this store.
User: Select a user from the dropdown list.
Role: Assign a role to the user. Click the + icon within the role field to choose an existing role or create a new one.
Payment Devices Tab: Manage payment devices linked to this store.

Add Payment Device Button: Opens a dialog for adding a new payment device.
Payment Processor: Choose a payment processor (Flawless Payments or NMI/ChipDNA).
Device Name: Provide a name for the payment device.
Merchant Number: Enter the merchant number associated with the device.
API Key: Provide the API key for device configuration.
Terminal ID: Enter the terminal ID for the device.
Additional Addresses Tab: Add and manage supplementary addresses for the store.
Lookup/Auto Complete Address: Start typing an address to receive automatic suggestions.
Address Line: Provide the specific address line.
Country: Select the country for the address.
City: Enter the city.
State: Select the state.
Zipcode: Enter the postal code.
Email: Add an email address for the additional location.
Phone: Provide a contact number for the additional address.
Troubleshooting
If you encounter any issues while trying to Create a Store Location, please reach out to Flawless POS customer support for technical assistance.
Was this article helpful?
That’s Great!
Thank you for your feedback
Sorry! We couldn't be helpful
Thank you for your feedback
Feedback sent
We appreciate your effort and will try to fix the article
